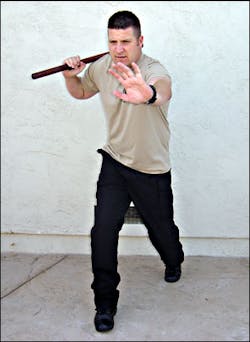
A recent Officer.com poll showed that defensive tactics (including baton) was the most neglected area of training in law enforcement. Other training areas listed in the survey were firearms, less-lethal weapons, driving, law, and even foreign languages. Apparently most officers recognize that although baton training may not be as exciting as firearms or TASER training, it is equally as important to ensuring their safety.
Having been an Impact Weapon (baton) Instructor for several years, I have seen the same mistakes repeated ad nauseam. Listed below are five of the most common errors and their associated remedies to ensure you are maximizing the effectiveness of your baton.
Baton worn incorrectly on duty belt
Many officers place the baton so far back on their duty belt that it's difficult for them to access it. The officer's radio, OC spray, flashlight, TASER or other items positioned too close to the baton can also hinder a smooth draw. When taking into account the increased heart rate and associated loss of fine motor skills that are sure to occur during a confrontation requiring the use of the baton, it's easy to see how significant a problem this can be.
Your baton should be carried on your non-gun side and should be positioned in such a way as to be easily drawn with either hand. You need to be well-versed in drawing your baton quickly while still focusing on the threat. Looking down to draw your baton is a tactic that could result in you being seriously injured (or worse) against a fully committed suspect.
Wrong leg forward
When I attended the police academy, students were taught to keep their "gun side" away from the suspect when deploying their baton. However, many instructors have since recognized that having your gun side forward offers a significant advantage.
The main reason for carrying a baton is to be able to strike a suspect without being in range of the suspect's attacks. Having your gun side forward affords you several inches more reach than the traditional method.
To better understand this concept, stand facing a wall with your gun side forward. While holding your baton in your gun hand, position yourself so that the tip of the baton touches the wall. Now, replace your lead foot with your rear foot so that your gun side is furthest from the wall. As you can see, you are giving up several inches if you choose to keep your gun side back.
You might be thinking that standing with your gun side closest to the suspect, puts you at a greater at risk of being disarmed. But remember that the suspect would have to endure several baton strikes to get to your gun. If those strikes were delivered correctly, the suspect would have very little chance of grabbing your gun.
Limited hip rotation
The importance of hip rotation cannot be overemphasized. By rotating your hips into the strike, you are using the weight of your entire body to generate power. With your gun side forward, your hips are free to rotate completely as you deliver strikes. When your gun side is back, your hip rotation is hindered by your body position. Therefore, you should be able to deliver a significantly more powerful strike with your gun side forward. In order to facilitate full hip rotation, pivot on the balls of your feet when striking.
Incorrect grip/striking surface
This applies only to straight batons. I vividly remember a departmental training session several years ago when we were striking bags with our newly authorized 29-inch straight hardwood batons. At that time, I was being considered for the position of Impact Weapon Instructor. Of course, I was striking the bag with all my might, in hopes of impressing the sergeant in charge of the program. Unfortunately, although I struck the bag with tremendous power, my baton went sailing across the room upon impact. My poor grip made quite an impression! Thankfully, no one was injured by my flying baton.
You've got to have a good grip to deliver effective strikes. When gripping the baton, position the bottom portion of the grommet between your fingers. After you've achieved a proper grip, you need to consider the striking surface of the baton. Imagine that your baton is actually a sword. The edge of the blade is in line with your middle row of knuckles. When striking you must angle the baton so that only the "edge" makes contact with the target. If you strike with any other surface (i.e. the flat part of the blade), there is a good chance that you will disarm yourself upon contact.
Ineffective use of "off-hand"
Your off-hand plays a vital role when using the baton. It should never be left dangling by your side. Your off-hand should either be protecting your face or in the suspect's face! If the suspect were to charge you and get inside the arc of the baton, you could be in serious trouble. Not only have you lost your reach advantage, but also one or both of your hands are occupied (depending on how you're holding the baton).
Use the palm of your off-hand to maintain striking distance. You can either palm his face, which is an excellent distraction, or you could palm the upper arm/chest area, which tends to prevent the suspect from moving forward.
Remember to keep your off-hand up to protect your face, especially when delivering a strike to the leg. Officers have a tendency to lower themselves by bending at the waist, which leaves their head exposed. Instead, lower yourself by bending your knees.
Wow! Who would have thought so much technique was involved in swinging a stick? And we didn't even touch on topics such as verbal commands, disengaging, jabbing, blocking, etc. Still, I hope this article encouraged you to assess your current level of proficiency with the baton. The rest is up to you.
Train hard. Stay safe (and always carry your baton)!


